What is Amazon Web Services Server Migration Service | AWS SMS
- January 2, 2020
- 0
Amazon Web Services can be defined as a platform that provides reliable, easy-to-use and cost-effective cloud computing solutions. AWS is built using a combination of Infrastructure as a Service (Iaas), Platform as a Service (PaaS) and packaged Software as a Service (SaaS) offerings. Amazon also supports a wide range of migration services that can be used to physically transfer data between your data center and AWS.
DMS or Data Management Service is used to transfer on-site databases to AWS. It mostly supports the migration of one form of database to another type. An example includes Oracle to MySql. Server Migration Service allows the migration of on-site servers to AWS in an easy process. Snowball is a small application that supports the migration of terabytes of data inside and outside of the AWS environment.
What is Amazon Web Services Server Migration Service?
AWS SMS supports the automation of any on-premises VMware, Microsoft Hyper-V/SCVMM and Azure virtual machines to the AWS Cloud. It incrementally reproduces the server VMs as cloud-hosted Amazon Machine Images (AMIs) that makes it ready for deployment on Amazon EC2. Using the AMIs, cloud-based images can be easily updated and tested before deploying them into production.
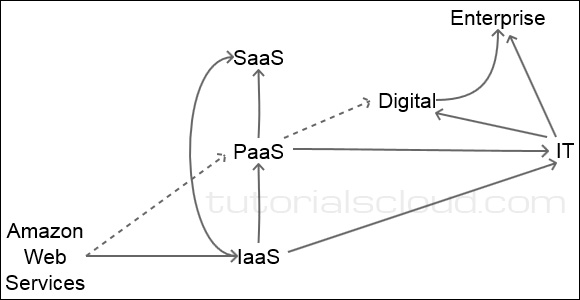
Image courtesy: w3schools.in
Types of Servers that can be migrated using AWS Server Migration Service
The virtual machines from VMware, vSphere, Azure and Windows Hyper-Vcan are migrated to AWS Server Migration Service. Amazon Web Services Server Migration Service supports the migration of Windows Server 2003, 2008, 2012 and 2016. It also migrates Windows 7, 8 and 10; Red Hat Enterprise Linux (RHEL), SUSE/SLES, CentOS, Ubuntu, Oracle Linux, Debian Linux OS and Fedora.
Advantages of AWS SMS
- Simplify the cloud migration process: A few clicks are just required to transfer a group of servers in AWS Management Console. Once the migration process gets initiated, AWS Server Migration Service controls all the intricacies involved in the migration steps. It automatically duplicates the volume of active servers to AWS and creates new AMIs periodically. EC2 instances can also be quickly launched from AMIs in the console.
- Orchestrate multi-server migrations: Amazon Web Services Server Migration Service coordinates the server migration by permitting the user to schedule replications and track the progress of a group of servers that comprises an application. The initial application can be scheduled, replication intervals can be configured and the progress of each server can be tracked using the console. At the launch of a migrated application, AWS SMS also allows the inclusion of customized configuration scripts that get executed during startup.
- Test server migrations incrementally: AWS Server Migration Service supports incremental replication and this permits easy, reliable testing of migrated servers. Incremental changes get replicated to the on-premises server and only the delta gets transferred to the cloud. This process allows testing of small changes iteratively and saves them on network bandwidth.
- Support the most widely used operating systems: Amazon Web Services Server Migration Service widely supports the regeneration of Windows operating system images and several major Linux distributors.
- Minimize downtime: Incremental AWS SMS replication reduces the business impact caused due to the application downtime at the time of the final cutover.
- Step by Step process of AWS SMS: The process of migration of on-premises servers to the cloud in a large-scale environment requires an orchestrator. An orchestrator automates schedules, reduces the bandwidth consumption for the replicated data and minimizes the cutover time of the migration process. AWS SMS is developed in order to simplify the end-to-end server migration process. The migration of on-premises virtual machines (VMs) is implemented by AWS SMS using a virtual appliance.
The server migration service of AWS includes four important stages:
-
Scheduling stage: This involves the scheduling of the migration job (either done immediately or at a particular date and time, based on the option selected).
-
Uploading stage: The first step is to take a snapshot. Next is to export VM to the OVF template. The 3rd step is to upload VMDK to the s3 bucket. The 4th step is to clear the snapshot.
-
Converting Stage: The VMDK file is converted to an Amazon EBS snapshot. Then the VMDK file available in the S3 bucket is deleted.
-
Creating AMI: The last step is to create an AMI.
AWS SMS needs a connector that coordinates the workflow of the migration procedures. This connector is positioned in the vCenter. Before deploying the SMS connector, it is vital to ensure that the environments meet the needs of Amazon Web Services Server Migration Service and have the right firewall configuration. Stateful outbound connections such as DHCP, DNS, HTTPS, ICMP and NTP services cannot be permitted without reconfiguring the firewall. Improper firewall configuration results in an unsuccessful deployment. A vCenter Service Account and an IAM user with appropriate policy and permissions also need to be created.
vCenter Server
A vCenter Server permits the management of multiple ESXi hosts and the virtual machines residing on them. vCenter server also includes several management tools that permit the arrangement of the hosts and virtual machines into clusters with vSphere DRS and VSphere HA. Numerous vCenter Servers are controlled by the vSphere Web Client.
Deploying the Server Migration Connector Virtual Appliance
A preconfigured Free BSD virtual machine that is available in the OVA format for deployment in the VMware environment is the Server Migration Connector. Once the server migration connector is downloaded, log in to the vCenter mentioning the sufficient credentials for deployment.
The context menu is opened for the vCenter from the inventory. Deploy OVF template is chosen. The Select Source page is selected. The location of the OVF template is specified in the dropdown box. The Next option is clicked.
The Review details page gets opened. The details of the OVF template are reviewed. The Next option is clicked.
There are two provisioning options for deployment. Thin provisioning (5.9 GB) and thick provisioning (299.0 GB). The thick provisioning option is suggested for the production environment.
After the details of the OVF template are reviewed, the Select name and folder page is selected. On this page, the appliance name and the deployment location are specified. The Next button is clicked.
The Select Resource page appears. On this page, the cluster, host and vAPP (resource pool) where the OVF template needs to be deployed is selected. The Next button is clicked.
The Select Storage page appears next. On this page, the Thick Provisioned Lazy Zeroed from the virtual disk format is selected. The datastore on which The OVF template requires to be deployed appears next. The Next button is clicked.
The Setup Networks page is chosen next. From the Destination drop-down menu, the network for setting up the network mapping is selected. The Next button is clicked.
The final page is Ready to complete. All the configuration settings are reviewed. Power on after deployment checkbox is selected and the Finish button is clicked.
Before starting the configuration process of the connector, ensure that the Server Migration Connector can resolve vCenter and ESXi hosts FQDN.

Configuring the Connector
Access the Connector VM at its IP address and open the setup wizard in the web browser. Select Get Started now.
The license agreement is reviewed. The checkbox indicating that the terms and conditions are agreed upon is selected. The Next button is clicked.
A password is created for the connector as per the credentials mentioned. The Next button is clicked.
The Network info page is opened. Here the network information is reviewed and the Next button is clicked.
Log Uploads and Upgrades page gets opened. If the logs need to get uploaded automatically, Upload logs automatically checkbox is selected. Also, select AWS Server Migration Service auto-upgrade checkbox. Click Next.
The last configuring step is the Server Migration Service. On this page, specify the AWS region by selecting the desired region from the list. The AWS Credentials are mentioned by specifying the IAM access key and the Secret Key of the IAM user. These keys are already created in the prerequisite steps. Click Next.
For creating a vCenter Service Account, mention the vCenter hostname, username and password. Complete the registration after accepting the vCenter certificate. The next step is to view the Connector configuration dashboard. Ensure if the connector that is registered is displayed on the Connectors page.
The Connectors page is divided into four sections:
-
The first is the AWS Service Migration Service section that includes settings that can be edited such as AWS access key, secret access key and vCenter logins.
-
The second one is the General Health section that contains the health check and connectivity status.
-
The third section Action allows the modification of the SMS administrator password and unregistering the connector. In order to always have the latest update, select the auto-upgrade action.
-
The logs can be downloaded, issues can be reported and documentation can be reviewed in the last section Support.
Now the server inventory is ready to get imported. The migration events can be orchestrated and automated.
Once the connector is successfully installed and registered, move to the AWS SMS console page and select Connectors. Click on Import Server Catalog to obtain the complete list of servers. This process requires some time for the server catalog to get fully populated and displayed. The server catalog can be re-imported or cleared at any time.
Creating a Migration Job
A migration job can be initiated only after ensuring if the datastore has the required space for creating temporary snapshots. Also, ensure that the chosen VM doesn’t include any ISO attached to it.
In the AWS SMS console page, select Replication Jobs. Under this, Create Replication Job is chosen. Here, select the servers that need to be replicated from the table. Click the Next button.
The license type for the AMIs that gets created from the replication job is selected. Linux servers include only Bring Your Own Licence (BYOL). Windows servers can access both AWS-provided licenses and BYOL. Once selected, click the Next button.
The next step allows the configuration of the replication job settings. The replication runs can either be started immediately or scheduled to start at a later date and time. The time should be about 30 days from the current time. Click the Next button.
The replication frequency is selected by choosing the desired value from the Replicate server every ‘drop-down’ list. The minimum replication frequency is 12 and the maximum is 24 hours.
Review all the settings. If the settings are correct, select Create. Click on the previous tab to go back to the appropriate pages to change any settings, if required.
In the AWS SMS console page, under Replication Jobs, all the replication jobs can be viewed. On selecting any replication job, the details of the job get displayed in the Job details Panel.
The migration task status can be viewed from the vCenter window. This displays the details if the snapshot is initiated and the OVF template is exported for transfer. Once the transfer is completed, the migration process progresses to the third stage. Here, the VMDK gets converted to an Amazon Elastic Block Store (Amazon EBS) snapshot.
Once the conversion is complete, the migration process moves to the last stage. The last step is to create an AMI for the point-in-time copy of the replication run. The AMIs for each replication run can be viewed from the Replication jobs, Run history tab of the console of Amazon Web Services Server Migration Service.
Testing before the actual cutover
The application can be tested before decommissioning the on-premises application. Depending on the replication frequency, many point-in-time replicas can be tested. The last replication job can be scheduled for the deltas.
In order to launch a specific instance, Run History is opened. Under Replication Job, Launch Instance is selected to test a specific instance. Select the instance type, configure the instance, include storage, tag an instance and configure the security group using the wizard.
Actual Cutover
After completing the testing, the actual cutover is started. The IOPs are paused. The last incremental replication job is initiated immediately and then the AMI is launched. As AWS SMS includes the incremental applications, the cutover time will be minimum based on the changes from the previous application run.
Deleting a Replication Job
Once the migration gets completed successfully and the migrated VMs are configured and are getting executed properly, the replication job can be deleted. This stops the replication from the on-premises data center to AWS. Under the Replication Jobs page of AWS SMS console, select the job and then click Actions, Delete replication job.
Now we assume that you know the meaning of Amazon Web Services Server Migration Service and completely understand its functioning in detail. If a doubt still persists, you can write that in the comment section and we will happy to help you out.
ApacheBooster is a software plugin that deals with server-related troubles like slow servers. In order to improve server response time or any other related problems, ApacheBooster works great. Hence, we suggest you to go with this plugin’s installation.